FRESHLY CUT TO ORDER   ·   NATIONWIDE DELIVERY   ·   EXPERT ADVICE

Turfing a lawn FAQ

First time laying turf? Read the first of our beginner’s guides to lawn laying to answer your queries!

What is turf and how does it arrive?

Our turf is rolls of luscious, weed-free grass ready-cultivated on the best, most suitable soil. It is then cut & rolled on the day before delivery. Turfgrowers cuts all our turf especially to each customer’s order so you can be certain it’s fresh and healthy when it reaches you. The purpose of turf is to quickly& painlessly establish a beautiful, pristine & vibrant lawn without the need for a lengthy seeding process that can leave your lawn bare & unusable for months, and can produce unsatisfying or inconsistent results. Turf provided by Turfgrowers is carefully selected as high quality, fine-bladed grass well established on firm, fertile soil.

Your rolls of turf will arrive on our overnight delivery service, delivered by pallet. Our lorries use a hydraulic lift to unload the turf at your garden ready for unpacking. Once unpacked it should be placed in the dry and laid immediately to minimise decomposition.

What should I do with my old turf?

Before you can lay a new lawn you need to prepare the ground for new turf. This is covered in our How to Lay a Lawn page, however it’s very important to note that the process of preparing ground for a new lawn takes time and care, and will take too long to complete if you have your new turf sitting in the driveway when you begin. Ensure the ground is thoroughly ready for your new turf BEFORE placing your order. This will leave you with lots of old turf to dispose of.

A turf cutter will remove old turf neatly and quickly, while a spade and/or turf lifting iron can be more suited to smaller areas. Either way, the rotting turf you want rid of will need moving as soon as possible.

If you’re a keen gardener you could compost your turf to produce loam, a valuable compost material with a great nutritional profile for your plants. There are lots of interesting articles & opinions online on the best way to compost your turf, however you should bear in mind that the turf will need to be upside down and covered, to prevent the grass from continuing to grow, and to keep heat & moisture trapped inside. Some gardeners recommend sandwiching other material between layers of turf. Nonetheless, this will take at least 12-24 months to compost properly.

It is always worth considering ways to reuse & recycle garden waste, and with enough turf you could end up with high-quality compost worth hundreds of pounds. However, if this is a bit long-term for you, or you don’t have the space for this, you could always try and find someone willing to take it off your hands. The internet is a great resource for locating local gardening enthusiasts who might be able to collect it from you for free, or may even pay you for it.

What should I do with my newly laid turf?

After laying, a lawn needs a lot of care. For a few weeks it will need as much attention as if you had planted it seed by seed- however after this period you will have a perfect, ornamental lawn, instead of a muddy patch strewn with seeds.

A lot of the initial work on a newly laid lawn will depend on the weather, and the state of the soil. Your main goal in your turf aftercare is to encourage the growth of new roots from the turf- this will establish the new grass in the soil and ensure continued survival & growth. In order for roots to grow the soil will need to be full of moisture and free from debris. If the weather is too hot you may need to water your new lawn weekly, or even every five days.

Avoid walking on your new lawn for several weeks, until you are certain the roots are firmly established. You can check for root growth under newly laid turf by using a sharp knife to prise up a corner of lawn. Check for small pale shoots appearing through.
Moving? Discover what a new lawn could do for you.

Laying Turf in Winter

Laying turf in winter may seem a peculiar thing to do but if you can endure the cold temperatures there are a number of advantages to donning your gardening gloves as soon as the New Year starts.

Whilst you will have to get wrapped up nice and warm, laying turf in the winter is simplistic and perhaps easy than doing it in summer. The results can also be equally as good.

At Turf Growers we cultivate turf all year round so we know that winter is a great time for harvesting. The benefit of buying and growing your turf in winter is so that turf can root and establish long before summer arrives. This means that your lawn should be luscious and green come the start of summer.

Another significant advantage of laying turf in winter is that you will not usually have to water your newly laid turf. Higher rates of rainfall in the later winter months and early spring will do this for you. Avoid the hassle of having to water your turf frequently and also save some money in the process.

Turf laid in winter will not be affected by frost. Newly laid turf will not be lifted by frost and there is no long term effect on the turf caused by frost. The only time you cannot lay turf is when the ground is frozen. In winter rolls of turf will keep longer. You can buy them a couple of weeks in advance and store them before they need to be laid.

Naturally turf is not affected by being frozen. In the eventually that you buy a turf roll and the turf freezes you will be able to allow the turf to thaw naturally. There will be no adverse effects on the quality of the turf. Even if turf becomes completely frozen solid it can keep for days or weeks after. Imagine it the same as if you took an item out of your freezer.

Should it occur that the ground freezes in the days between you ordering turf and it arriving, you have two options. You can either wait for the ground and turf to thaw. As aforementioned, turf will keep for a number of weeks and remain in perfect condition. Alternatively, you can contact Turf Growers and as long as the turf you ordered has not been harvested and despatched you will be able to postpone your order.

View our how to lay turf guide for useful tips and  check out the full selection of TGA standard lawn turf available at Turf Growers. Order today with the view to lay your turf in winter and you could reap the benefits of a thick and rich lawn that is ready for summer.

Creating a patterned lawn

Patterning your lawn is not as hard as you may think. As well as making your garden look great it also has the added benefit of being good for your grass. Three different types of pattern we will look at are a simple striped pattern, a checkerboard pattern and a diamond pattern. These types of patters often appear on the lawns at well maintained sports grounds and will give your garden a truly professional look.

One way of patterning your lawn is a process known as lawn striping. This can be used to hide imperfections in your garden such as colouring defects, weeds and bare patches. It can also be used as a highlighting tool to draw attention to your best garden features such as a water sculptures, plants or outdoor patio areas.

One of the easiest lawn patterns to do is a simple lawn stripe. To create a simple striped lawn pattern begin by mowing the edges of your lawn. Start on the left side and mow parallel to the edge of the lawn. Use the edge of the lawn to make sure that you mow in a straight line. When you have reached the end of the lawn and completed a strip, turn the mower 180 degrees so it is facing the complete opposite direction and return in another straight line down the lawn. When turning the mower be sure to use a Y motion in order to prevent scalping from occurring. Make sure that the mower overlaps your previous strip a little in order to stop uncut strips forming.

A checkerboard lawn can be created by following the exact same steps as for a striped lawn. Simply mow your lawn the same as you would for a simple striped lawn but then also mow lengthways as well as long ways. When complete be sure to mow around the perimeter to help maintain a tidy border.

A cross-cross or diamond pattern is achieved by mowing diagonally North West to South East and then in the reverse direction North East to South West. This is after again firstly performing basic vertical lawn striping. Once again follow all the necessary steps making sure to turn the mower 180 degrees and in a Y motion at the end of every strip and ensuring that the mower slightly overlaps the previously mown strip to prevent uncut strips. Going around the perimeter at the end will again help keep your borders in perfect order.

In order to maximise patterned lawn effect be sure to get the best quality surface when you buy turf. At Turf Growers we have quality rolls of turf available to suit all pockets so be sure to see our full collection. Once you have bought turf have a go at patterning your lawn with our simple guide to lawn striping and achieve the professional looking lawn you’ve always dreamed of.

Laying Turf in March

Is it possible to lay turf in the spring?  Yes, of course it is, and here are some top tips to ensure that your new lawn turf will not just survive but thrive!

  1. Preparation is (still) key
  2. Just in time ordering (we deliver turf next day, get a price here)
  3. Looking after your lawn once it’s laid

The quality of your lawn will depend on the quality of your preparation. Luckily for you, there are very few perennial weeds growing at this time of year, although the mild temperatures mean that more are around than usual this year. Make sure you clear them all away, using a good systemic weedkiller if like most of us, you’re not confident that you can dig out every last root. The ground is pretty wet for digging over at the moment, and you’re likely to compact it if you try to stand on it, so wait for a reasonably dry period, say a week or two, before you start.

It’s a bit like stock control in factories, odd though that sounds. You don’t want your lawn turf standing around for any length of time, as it’s not good for the turf. So buy turf or order it from your turf suppliers just before you want to lay it. That may mean monitoring the long-term weather forecast for a while. You don’t want to lay turf when it’s very wet or very cold, that is, when the ground is frozen. So don’t order the turf until you’re confident that you have a few days’ grace when it’s not forecast to rain or freeze.

If the weather does turn against you, and you have to leave the turf unlaid for a few days, unroll it and leave it flat, instead of in rolls.

Over the last few years, we have had some pretty extreme weather, including long spells of both wet and dry weather, even in the spring. Both could be problematic, so let’s deal with them in turn.

First, wet weather. If it’s really wet, try to avoid walking on your lawn if possible. Regular foot passage in the wet will damage any lawn, but a new one is particularly vulnerable because the roots have not yet established, so it won’t come back after damage.

And if it’s very dry, you’ll need to water your new lawn more often, say every couple of days, instead of once a week, until you’re confident that it’s well established. If you’ve invested in good quality turf, it’s best to safeguard your investment, at least for the first few months. 

What is the Best Time of Year to Lay Turf?

We are often asked what is the best time of year to lay turf.  Like all living organisms, there are optimal conditions for growth. Turf is no exception to that rule. The way it’s treated affects how healthy it’s going to be and how it performs. The initial treatment of turf is thoroughly vital. If it’s neglected at the start, this can have dire consequences and it could end up dying. Imagine having to stop before you’ve even started! 

So when is the correct time? Is there a specific day, like the 5th of April? Of course not, it depends on the conditions. But there are certain periods of the year which tend to consistently create certain productive environments for growing. According to the Royal Horticultural Society that time period is probably mid-autumn.

The truth is turf can be laid at any time of year, especially between early autumn and early spring.  However, you can’t lay it when the ground is frosty or very wet. Which is why winter is often a challenge. Although it CAN be a good time to lay turf depending on what sort of winter the UK is having. Frozen ground will prevent plant growth and stop any vegetation emerging. Although Luckily it doesn’t have any substantial detrimental effects on the soil going forward.

what time of year to lay turf

It is best to avoid periods of high temperatures or drought. The lawn will require a lot of water and additional care and may be dry when delivered. This can make turf laying in July and August more challenging. In an ideal world turf should be laid when the ground is neither waterlogged or dry. This makes spring and autumn the best times of year.

There is a real reason why you have to wait for the ground to be dry and not frosty. Good preparation of the ground is crucial to getting a good lawn. This is not an overnight job, as you will need several weeks to ensure that all the weeds are gone, and that the ground has settled. 

Gardener Self Preservation

You cannot neglect your own health when you are trying to look after the turfs. There can be the false impression that doing a bit of gardening is a breeze. It can be physically demanding at times, even if it is relaxing and therapeutic generally.

So you want to treat it as if you are preparing for an (extremely less taxing) marathon. Keep fluids nearby and keep topping up, ensuring you are fully hydrated. And I know it sounds simple but before you begin - EAT! Calories will be discarded as you create your perfect lawn quicker than you think.

Laying it down doesn’t need to become a painful practice - so avoid getting sunburn/sunstroke. Wear a hat, use suncream, even if the sun is barely out. Heat blisters could become a problem if you’re using tools. Use gardening gloves and remember - there is absolutely no rush. 

How to prepare the site for turf 

To start with, clear all the weeds from the site, especially perennial weeds such as bindweed and couch grass. You may find it helpful to use a good systemic weedkiller at this stage. This ensures that you have got rid of all the roots. Figure out how much turf is needed at any time of the year with our trusty calculator.

Dig over the site to about a spade’s depth or a little bit more, and dig in some well-rotted organic matter. Allow the ground to settle for a few days or weeks after digging, to ensure that your lawn surface will be level. Once you’ve done all this, tread the ground over several times to flatten it fully, and rake it to ensure that the soil is fine to encourage root growth.

Once your site is absolutely ready, and not before, you can buy your turf (see our online shop for prices). Most turf suppliers can supply good quality turf quite quickly, so you can have it delivered within a few days at most. Be ready to lay the turf as soon as possible after delivery, as turf is not good kept hanging about. For tips on laying your lawn well, take a look at our handy guide to laying turf.  

Once you’ve laid your lawn, avoid walking on it for a few days, and longer if possible. Obviously if you’ve installed new lawn in these months, some of your visitors (or yourself) may want to have a walk around to test it! It is an exciting new addition after all.

If you’re laying lawn turf in spring, you also need to be aware that new turf often needs watering over summer. And you should avoid mowing it for as long as possible. Mowing before the grass has properly rooted, and allowing the grass to dry out, both stress the plants, and make it harder for the lawn to root properly. This is likely to lead to problems later, so is well worth avoiding.

Growing Lawns in the Shade

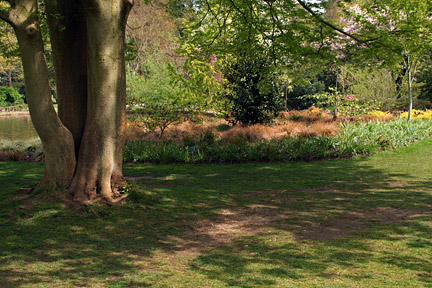
Growing grass in shady places is a challenge. Yes, it might be easier to give up and have a patio, but everyone loves a lawn, and with the help of this article, you too should be able to manage a beautiful stretch of lawn turf even in a shady area, although perhaps not in a wood!

Most grass in a turf mix needs about four to six hours of sunshine a day in the summer. Much less, and it becomes less vigorous and prone to disease. But there are now seed mixes that are specifically designed for shady areas, and which give much better results. Fescue grasses cope better with shade, droughts and poor soil, but if your soil is very wet, then you will need a mix with more bent grasses.

But you can also give your lawn a helping hand by giving it slightly different care if it’s shady. So what can you do to help?

  1. Remove some of the shade
  1. Remove some of the lawn
  1. General maintenance

shady lawns

It sounds radical, but could you perhaps cut down some of the trees that are making the shade? If not, you could try cutting them back to increase light. You could, for example, try raising the crown by removing the lower branches, or thin the whole canopy. You’re probably best off getting professional advice from a good tree surgeon, especially if your trees are large.

If you are planting trees, select species that cast only light shade, such as rowans.

It can be best to have no lawn around a tree for a patch of about 1m from the trunk. This avoids the tree and lawn turf competing for moisture. So you could have a gravel patch around the tree instead.

Cut shaded lawns less often, and keep the height greater. You can keep the cut as high as 6-9cm, and you should always remove the clippings. If you need to water the lawn, the best way is heavily and infrequently, as this will encourage the trees to root deeply and not compete with the lawn turf for moisture. Feed in autumn with a high potassium lawn feed. You can also feed the lawn in spring, about a month before the trees start to leaf. Use about half the rate of spring/summer lawn feed that you would normally apply to a lawn in full sun.

You may find that you have a moss problem in a shady lawn, as moss tends to out-compete the grass under these circumstances. See our article on mosses for more help.

If your lawn gets very patchy in shade, it can help to reseed all over with a shade-tolerant mix. Alternatively, you can returf, buying shade-tolerant turf from turf suppliers.

How to Create a Chamomile Lawn

A beautiful stretch of lawn turf is a joy to behold, but it’s also quite a lot of work, what with the mowing, feeding, aerating, scarifying and so on. But are there low maintenance alternatives? We’ve run a few articles about wildflower meadows, but how about a chamomile lawn?

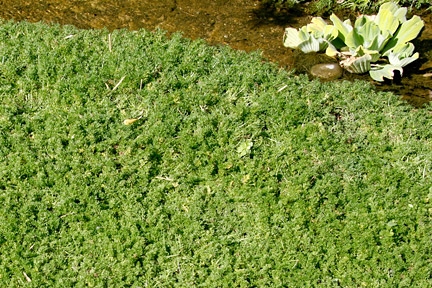
Chamomila lawn 623438

Is your garden suitable?

Chamomile needs sunshine, and it also needs light soils, and some moisture. Heavy clay soils are not suitable as they will be both too wet in winter and too dry in summer. A very dry, stony site is also unsuitable, as the chamomile will be patchy. A chamomile lawn is also unsuitable for areas that you want to walk on regularly. They will tolerate only very light foot passage, so it’s no good planting one if you have children running about, or you want to use the garden heavily. But if you want to sit and admire the lawn from a patio, and don’t want to have to mow, it could be the ideal option for you.

Preparing the site

Your best chance of establishing a chamomile lawn lies in thoroughly eradicating perennial weeds first. You may need up to three applications of systemic weedkiller, together with hoeing and hand weeding, before the site is ready.

Plants or seeds?

The most suitable cultivar for a chamomile lawn is C. nobile ‘Treneague’, which is a low-growing clone that does not flower. Because it’s a named cultivar, it doesn’t come true from seed, so you’ll need to buy plants. Plants are generally available as small runners or as larger potted plants. These are more expensive, but you can divide them before planting, to make more plants. Depending on the size, you’ll need to space the plants at about 10-20cm apart. Obviously, if you plant them closer together, the lawn will look better more quickly, but it will cost more.

Caring for your chamomile lawn

A newly planted chamomile lawn should not be walked on for at least 12 weeks, and ideally, you should keep off it as much as possible for the whole of its first year. In fact, if you can avoid walking on it at all, that would be ideal! A chamomile lawn will get patchy if it has all but the very lightest foot traffic, and once it gets patchy then you’ll have problems with weeds. And because it’s not grass, you won’t be able to use a standard weedkiller, but will have to dig out weeds by hand, or use a spot weedkiller.

The ideal solution to enable to you avoid walking on your lawn is probably to put a paved or gravel path through it. This will avoid all foot traffic, and keep it looking lush and green throughout the year.

Establishing Wildflower Meadows

With recent press about wildlife gardening and drought-resistant planting, you may have decided to grow a wildflower meadow. But what do you need to do to establish one?

1) Choose your type of meadow: annual or perennial?

Perennial wildflower meadows need poor soil, because then grasses compete less with the wildflowers. Annual meadows need rich soil, so are ideal if you’re converting an existing garden border. If your heart is set on a perennial meadow, then you may want to remove the top layer of soil, and rotavate and sow directly into the subsoil.

2) When Should You Sow Your Seeds?

On lighter, sandier soils, September is the ideal time to sow your wildflower meadow, as some of the seed will germinate straight away. However, on heavier soils, any seed that doesn’t germinate now is likely to rot over winter, so it’s best to wait until March and April to sow.

3) Preparing the Ground

First, use glyphosate-containing weedkillers to kill off perennial weeds such as nettles and docks. As when you are laying lawn turf, you then need to dig the soil, and firm and rake to make a seedbed. Allow a month or so for the soil to settle and for any weed seeds to germinate so that you can remove them.

If you’re converting an existing lawn into a wildflower meadow, this will take time. First, you’ll need to stop feeding and weedkilling the turf, but keep mowing it every week to weaken the grass, at least for the first year. Some wild species will establish by themselves, but you will need to introduce others. You can do this using plug plants, or raise them from seed in pots, introducing them when they are one to two years old.

4) Sowing

You can sow even quite large areas of seed by hand, using the broadcast rate given on the seed packet. As with lawn seed, after sowing, rake it in, water thoroughly and net it to protect it from birds, pets and children.

5) Maintaining Your Meadow

The major problem with wildflower meadows is that grass tends to outcompete the flowers, especially in early years. You can overcome this by sowing yellow rattle, a semi-parasitic plant that weakens the grass. Sow seed in late summer or autumn onto grass that has been cut short, or introduce as plug plants and allow it to seed the next year. 

For both annual and perennial meadows, you may need to sow more wildflower seeds for several years, until the balance between grass and flowers has been struck. You can also use plug plants of particular species, if you find that some do not establish very well in your garden. 

(For more: Pros and Cons of a Wildflower Meadow)

Why You Should Lay Your Own Turf

When it comes to our gardens, some of us relish in the DIY aspect of it, with it becoming a hobby and a passion. Others among us aren’t fans, and would prefer to sit back and allow someone else to do it for them.

Laying your own turf has merits which are not to be ignored.  But why exactly should you lay your own turf?

The main reason you should lay your own turf is that it is fairly easy, if you are fit for the job (and you don’t need to be an Olympic medallist!) and it will save yo money!

Here is a quick, easy, step-by-step how-to for laying your lawn:

  1.  Prepare the topsoil. Take up any old grass, then remove any stones or weeds left in the ground. Level off your garden, roughly is fine, by flattening any lumps and bumps as well as filling holes. Use a fork to loosen all the soil, then use a rake to finish it off. Go back over your soil to firm it, either using a roller or by walking on it. Then sprinkle it with fertiliser and rake the soil once more, watering it well afterwards, preferably with a sprinkler attachment to ensure even water distribution.
  2.  Buy your turf. We offer next day delivery provided you order before the right time of day, so you can prepare your garden in time for delivery. Ideally, you should buy your turf when the garden surface is prepared so you aren’t rushing at the last minute. If you live in a dry area, choose drought-tolerant turf that will resist the dryness.
  3. Water your turf on arrival if you do not plan to lay it the same day, unrolling each roll carefully as you go.
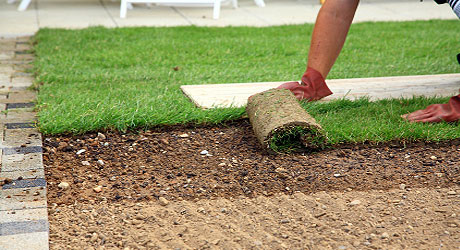
  4. Starting at the furthest straight edge of your garden, lay your first row of turf. You should unroll the turf slowly to prevent damage to the grass. Keep the pieces as close together as you can, patting it down firmly (but not too firmly) with either a shovel or the back of a rake.
  5. Lay another row, staggering the pieces as you would when building a wall. Again keep the pieces close and tamp each piece down.
  6. Using a cutting tool, such as the semi-circular cutting tool, and a board (if trying to achieve a straight edge), crop the edges of your turf. You may prefer a curved line, or be aiming for a straight finish. Either is possible.
  7. Next, get your sprinkler attachment on the hose going. A watering can is rarely enough. Give your lawn an initial good soaking. Avoid walking over the turf if you can, as it can take several weeks to root and walking on it could disturb the process.

Professionals can charge upwards of £11 per square metre, some charging around £20. For a complicated job, it could be worth getting a professional to at least assess the work, but once you know what needs to be done, it is much cheaper to do it yourself if you make a point of doing it correctly. For a lawn of 20 square metres, the prices above could mean you are anything from £220-£400 out of pocket! You could instead use the money for garden accessories or even a new garden furniture set.

By laying your own turf, you will get a personal reward, knowing you did it successfully yourself, learning a new skill in the process. When your neighbours come over, you can proudly say that you laid the turf yourself.

If you lay your own turf, nurturing it carefully in order to help it to establish in the beginning and to allow it to continue to grow healthily, you will enjoy it for a long time to come while remembering that you accomplished it ‘all by yourself.’

How to Plan a Lawn

So you have decided you want to create a lawn; whether you are working with existing lawn or starting a fresh with new turf and topsoil then here is my guide to help you create your perfect lawn.

planning a lawn

  • Make a plan.  The word "plan" should not be underestimated here, draw your plan of what you want to achieve and stick to it!
  • Appearance is everything.  Plan what you want the final thing to look like taking into account how you will be using that space; e.g if you have children, pets or even no use at all.  If you are creating a front lawn and want to impress the neighbours then you need a fine bladed, Ornamental Turf
  • Soft & sweepy.  Plan an open, soft sweeping lawn even in small areas.
  • A small space? If the area is small, try not to confuse the area with too much detail, keep it simple to create a large feeling space.
  • Make it interesting.  Try curving the edges of the lawn, making it more interesting and luring.  Use string and pegs to mark out your curves.
  • Gentle slopes.  If you can, adding some gentle slopes into the lawn by using Topsoil, running away from the your house which will not only allow any surface water to run away from the building but also give a depth to the garden.
  • Trees and Plants.  What trees and plants do you have in this space currently, how will you work them in and around your plan? What would you like to put there?  These factors need to be thought of.
  • Sunshine, you are my sunshine.  Take into consideration the aspect of your garden and the way the sun tracks across the sky throughout the day. Does your garden get sun light in the morning, afternoon, evening, all day or non? If you have a shady area then you might want to purchase a Drought or Shade Resistant Turf.  
  • Soil Type.  If you are replacing the existing turf you will need to take off a depth of 2 inches.  If your soil is clay or sandy, then you may want to add a sharp sand or well rotted manure to improve it's quality and drainage.  The topsoil needs to be workable and to a depth of around 4-5 inches.So why turf?  

Turf is the simplest and easiest way.  Prepare your ground, lay your turf and in just a few weeks your lawn will look as if it has been there for years.  See our blog "How to Plan a Lawn" for help or see our Turf Calculator to measure how much turf you require.

If you would like any further information then email:This email address is being protected from spambots. You need JavaScript enabled to view it.